Dear blog, it has been an awfully long time since my last post, I hope you are in a forgiving mood. During the past two months, I have actually been blogging elsewhere, but you will always be my first and most important blog site. The reason for the absence is that in mid-July I started my one-year sabbatical from my finance job in order to do my Computer Science Masters (see my Back To School post from March) and I used the summer to go travelling in Singapore, Australia and New Zealand. I used this blog as a photo diary of my adventures so that my parents could check that I was still alive.
While on my travels, I really lived life on the edge - I went on helicopters, mountain and glacier hikes, caving, white water rafting, scuba diving, bungy jumping and sky diving, but throughout my trip my laptop and university pre-course reading were never far away. The textbook I have been working through is called Problem Solving with C++ by Walter Savitch...many people I met on my trip thought it was weird that I had brought work with me, but I had some looooong coach journeys to sit through and so far I have enjoyed working through the "homework" problems at the end of each chapter.
This blog post is a walkthrough of my solution to one of these problem sets, and what better way to resurrect my blog than with an article about the Game of Life. Before we get into the meat of the solution, I just want to spend a bit of time comparing and contrasting C++ with Python (the programming language I had previously had most experience with). When people who have some programming knowledge ask me what language my Masters course will use, they generally make the following face, when I tell them it will be taught in C++:

Python:
Phew! That was a long detour, but now we've gotten that out of the way, let's get onto the meat of the Game of Life solution! The following description is taken from Chapter 7, Programming Project 13 of the Savitch textbook and you can also read a more detailed and very interesting Wikipedia article (complete with cool gif animations!):
The mathematician John Horton Conway invented the "Game of Life". Though not a "game" in any traditional sense, it provides interesting behaviour that is specified with only a few rules. This Project asks you to write a program that allows you to specify and initial configuration. The program follows the rules of LIFE to show the continuing behaviour of the configuration.
LIFE is an organism that lives in a discrete, two-dimensional world...This world is an array with each cell capable of holding one LIFE cell. Generations mark the passing of time. Each generation brings births and deaths to the LIFE community:
So given these rules and a starting pattern of live cells on a two dimensional grid, with every generation the pattern of the live cells evolves.
I have put my code on my github page: https://github.com/ttz21/Game-of-Life
Using the framework for problem solving I outlined in my TicTacToe Solution walkthrough, I'm going to start off with the all-important Step 0: Don't Panic. So after taking deep breath, let's consider the following....
const int WIDTH = 20, HEIGHT = 20; (it's customary to give constants names in uppercase, the const means the program can't alter these variables, and the int declares them as integer variables)
I have used an array of integers to track live (1) versus dead (0) cells, though this could also be accomplished using an array of booleans (true/false). For this solution, the initial configuration has to be input manually (no, I didn't sit and write out all the curly brackets and "0," x400, I wrote a program that did it for me!) - I have put in a little star pulsar pattern that repeats itself every third generation, to give us something pretty to look at when the program is complete! The code below declares a two-dimensional array of integers named "board", with HEIGHT+2 rows and WIDTH+2 columns (the reason for the +2 will become clear later...)
int board[HEIGHT + 2][WIDTH + 2] = {
{ 0, 0, 0, 0, 0, 0, 0, 0, 0, 0, 0, 0, 0, 0, 0, 0, 0, 0, 0, 0, 0, 0 },
{ 0, 0, 0, 0, 0, 0, 0, 0, 0, 0, 0, 0, 0, 0, 0, 0, 0, 0, 0, 0, 0, 0 },
{ 0, 0, 0, 0, 0, 0, 0, 0, 0, 0, 0, 0, 0, 0, 0, 0, 0, 0, 0, 0, 0, 0 },
{ 0, 0, 0, 0, 0, 0, 0, 0, 0, 0, 0, 0, 0, 0, 0, 0, 0, 0, 0, 0, 0, 0 },
{ 0, 0, 0, 0, 0, 0, 0, 0, 0, 0, 0, 0, 0, 0, 0, 0, 0, 0, 0, 0, 0, 0 },
{ 0, 0, 0, 0, 1, 1, 1, 0, 0, 0, 1, 1, 1, 0, 0, 0, 0, 0, 0, 0, 0, 0 },
{ 0, 0, 0, 0, 0, 0, 0, 0, 0, 0, 0, 0, 0, 0, 0, 0, 0, 0, 0, 0, 0, 0 },
{ 0, 0, 1, 0, 0, 0, 0, 1, 0, 1, 0, 0, 0, 0, 1, 0, 0, 0, 0, 0, 0, 0 },
{ 0, 0, 1, 0, 0, 0, 0, 1, 0, 1, 0, 0, 0, 0, 1, 0, 0, 0, 0, 0, 0, 0 },
{ 0, 0, 1, 0, 0, 0, 0, 1, 0, 1, 0, 0, 0, 0, 1, 0, 0, 0, 0, 0, 0, 0 },
{ 0, 0, 0, 0, 1, 1, 1, 0, 0, 0, 1, 1, 1, 0, 0, 0, 0, 0, 0, 0, 0, 0 },
{ 0, 0, 0, 0, 0, 0, 0, 0, 0, 0, 0, 0, 0, 0, 0, 0, 0, 0, 0, 0, 0, 0 },
{ 0, 0, 0, 0, 1, 1, 1, 0, 0, 0, 1, 1, 1, 0, 0, 0, 0, 0, 0, 0, 0, 0 },
{ 0, 0, 1, 0, 0, 0, 0, 1, 0, 1, 0, 0, 0, 0, 1, 0, 0, 0, 0, 0, 0, 0 },
{ 0, 0, 1, 0, 0, 0, 0, 1, 0, 1, 0, 0, 0, 0, 1, 0, 0, 0, 0, 0, 0, 0 },
{ 0, 0, 1, 0, 0, 0, 0, 1, 0, 1, 0, 0, 0, 0, 1, 0, 0, 0, 0, 0, 0, 0 },
{ 0, 0, 0, 0, 0, 0, 0, 0, 0, 0, 0, 0, 0, 0, 0, 0, 0, 0, 0, 0, 0, 0 },
{ 0, 0, 0, 0, 1, 1, 1, 0, 0, 0, 1, 1, 1, 0, 0, 0, 0, 0, 0, 0, 0, 0 },
{ 0, 0, 0, 0, 0, 0, 0, 0, 0, 0, 0, 0, 0, 0, 0, 0, 0, 0, 0, 0, 0, 0 },
{ 0, 0, 0, 0, 0, 0, 0, 0, 0, 0, 0, 0, 0, 0, 0, 0, 0, 0, 0, 0, 0, 0 },
{ 0, 0, 0, 0, 0, 0, 0, 0, 0, 0, 0, 0, 0, 0, 0, 0, 0, 0, 0, 0, 0, 0 },
{ 0, 0, 0, 0, 0, 0, 0, 0, 0, 0, 0, 0, 0, 0, 0, 0, 0, 0, 0, 0, 0, 0 }
};
In C++, when functions are defined, you must declare whether the function returns a value or variable. The display_board does not return anything, as it simply prints stuff to the user's screen so we declare it as a "void" function. The "for" loops can be interpreted as: starting with an integer, i at 1, increment i by 1 each time (i++) while i is smaller than HEIGHT+1. "cout <<" means output the statements that follow to the screen and "endl" simply puts the cursor onto a new line.
void display_board(int board[HEIGHT+2][WIDTH+2])
{
for (int j = 1; j < WIDTH+1; j++)
{
if (board[i][j] == 1)
cout << "*";
else
cout << " ";
}
cout << endl;
}
}
We need to know what the previous generation's board looks like in order to calculate the new generation, but after this has been done, we can discard the old board. This means we need to have two boards to work with at one time, as well as a function to copy the board that we use for our calculations onto the board used by the display_board function to show the latest generation.
The new_generation function below takes our board as an input and creates a temporary board of the same size. This temporary board is then filled with 1s and 0s according to the rules of the Game of Life using the configuration of our input board. When this has been done, our board with the initial configuration is overwritten with the temporary board using the copy_board function.
void new_generation(int board[HEIGHT + 2][WIDTH + 2])
{
int temp_board[HEIGHT+2][WIDTH+2];
int neighbours;
for (int i = 0; i < HEIGHT+2; i++)
{
for (int j = 0; j < WIDTH + 2; j++)
{
if (i == 0 || j == 0 || i == HEIGHT + 2 || j == WIDTH + 2)
temp_board[i][j] = 0;
else
{
//counting alive neighbouring cells
neighbours = board[i - 1][j - 1] + board[i - 1][j] + board[i - 1][j + 1]
+ board[i][j - 1] + board[i][j + 1]
+ board[i + 1][j - 1] + board[i + 1][j] + board[i + 1][j + 1];
if (board[i][j] == 1)
{
if (neighbours < 2 || neighbours > 3)
temp_board[i][j] = 0; //cell dies due to loneliness or overcrowding
else
temp_board[i][j] = 1; //don't strictly need to write this line, but I have added it for extra clarity
}
else
{
if (neighbours == 3)
temp_board[i][j] = 1; //birth of a new cell
else
temp_board[i][j] = 0;
}
}
}
}
copy_board(temp_board, board);
}
void copy_board(int board1[HEIGHT + 2][WIDTH + 2], int board2[HEIGHT + 2][WIDTH + 2])
{
for (int i = 0; i < HEIGHT + 2; i++)
{
for (int j = 0; j < WIDTH + 2; j++)
{
board2[i][j] = board1[i][j];
}
}
}
Once we have the display_board, new_generation and copy_board functions, all we need to do is implement them in the main function of the program! The code below has a "while" loop that keeps repeats as long as the user hits the Enter key. The program displays the board, then reads the user's input using the command cin.get(repeat) and then calculates the next generation of LIFE. cin is like the opposite of cout - it reads in a user's input from the keyboard and we are asking it to "get" one character (which I have called repeat). '\n' is the way we represent the "Enter" character in C++.
int main()
{
char repeat;
do
{
display_board(board);
cin.get(repeat);
new_generation(board);
}while (repeat == '\n');
return 0;
}
I don't want the solution to get too complicated in this blog post, but from the subsequent chapters I have read in my textbook, I could have implemented LIFE as a class and represented the board as a dynamic array. There are also interesting extensions to this problem to find static displays or cool evolving patterns, but I'll leave that to the mathematicians out there...
 |
| Maybe I should have done a career change to become a beach bum instead.... |
This blog post is a walkthrough of my solution to one of these problem sets, and what better way to resurrect my blog than with an article about the Game of Life. Before we get into the meat of the solution, I just want to spend a bit of time comparing and contrasting C++ with Python (the programming language I had previously had most experience with). When people who have some programming knowledge ask me what language my Masters course will use, they generally make the following face, when I tell them it will be taught in C++:
People then go on to say things like "If you can do it in C++, you can do it in any language". I'm not sure how C++ acquired this formidable reputation, but so far, I have to say that Python was definitely easier to learn and seems to be more flexible. As you will see with my C++ solution to the Game of Life, at the top of the code, there are some header statements - when you are a newb you just have to accept this as given and not get too bogged down with the details of why they are there. Also, with C++, when you use variables in your program, you have to define the variable's type in advance (e.g. whether it will be an integer, or a character etc), whereas Python sort of allows variable types to be defined as and when they are created. Similarly, when you want to run programs you have written in C++, they must be compiled first (compiling just means the computer checks through the code you have written in your editor and converts into code that your machine can understand), but again, Python cobbles it all together while the program is being run. The compilation stage is often useful as it brings up any errors before your program is being executed, and you do get a super satisfying feeling whenever your program compiles correctly the first time!
 |
| Ok, I've used this meme before - forgive me, I'm a Futurama fanatic |
Most of the time, it doesn't compile and for me, more often than not, it's because of these darn semicolons you have to put at the end of every statement in C++! After being used to coding in Python, it takes a while to get used to them... My final gripe with C++ is Microsoft Visual Studio Express - ok, so it's not really related to the language itself, but this is possibly one of the least intuitive and most beginner-unfriendly development environments EVER! Thankfully a new Macbook Pro is on its way to me and I will hopefully never have to deal with Visual Studio again!
Another way to illustrate the differences between Python and C++ is the different philosophies behind the two languages. The bullet points below are taken from Wikipedia, and I think the way they are written gives you a real feel of the conceptual differences between them as well as an idea of what it is like to code with them.
- Beautiful is better than ugly
- Explicit is better than implicit
- Simple is better than complex
- Complex is better than complicated
- Readability counts
- It must be driven by actual problems and its features should be useful immediately in real world programs.
- Every feature should be implementable (with a reasonably obvious way to do so).
- Programmers should be free to pick their own programming style, and that style should be fully supported by C++.
- Allowing a useful feature is more important than preventing every possible misuse of C++.
- It should provide facilities for organising programs into well-defined separate parts, and provide facilities for combining separately developed parts.
- No implicit violations of the type system (but allow explicit violations that have been explicitly asked for by the programmer).
- Make user created types have equal support and performance to built in types.
- Any features that you do not use you do not pay for (e.g. in performance).
- There should be no language beneath C++ (except assembly language).
- C++ should work alongside other pre-existing programming languages, rather than being part of its own separate and incompatible programming environment.
- If what the programmer wants to do is unknown, allow the programmer to specify (provide manual control).
This all sounds like a big rant against C++, but as with all new things, I've learnt to adapt and get used to it, so there really is no bad feeling between me and C++. Also, I'm sure it has many advantages over other languages that I'm yet to understand, but hope to discover during my Masters course!
The mathematician John Horton Conway invented the "Game of Life". Though not a "game" in any traditional sense, it provides interesting behaviour that is specified with only a few rules. This Project asks you to write a program that allows you to specify and initial configuration. The program follows the rules of LIFE to show the continuing behaviour of the configuration.
LIFE is an organism that lives in a discrete, two-dimensional world...This world is an array with each cell capable of holding one LIFE cell. Generations mark the passing of time. Each generation brings births and deaths to the LIFE community:
- We define each cell to have 8 neighbour cells...(directly above, below, to the right, to the left, diagonally above to the right and left, and diagonally below to the right and left).
- If an occupied cell has 0 or 1 neighours, it dies of loneliness (awwww....). If an occupied cell has more than three neighbours, it dies of overcrowding (anyone who has been on the Central Line will sympathise with this).
- If an empty cell has exactly 3 occupied neighbour cells, there is a birth of a new cell to replace the empty cell (hmm, talk about a love triangle..?! this Conway dude can't have been much of a biologist)
- Births and deaths are instantaneous and occur at the changes of generation. A cell dying for whatever reason may help cause birth, but a newborn cell cannot resurrect a cell that is dying, nor will a cell's death prevent the death of another, say, by reducing the local population.
So given these rules and a starting pattern of live cells on a two dimensional grid, with every generation the pattern of the live cells evolves.
I have put my code on my github page: https://github.com/ttz21/Game-of-Life
Using the framework for problem solving I outlined in my TicTacToe Solution walkthrough, I'm going to start off with the all-important Step 0: Don't Panic. So after taking deep breath, let's consider the following....
1. What are the inputs?
That's simple - the initial configuration of live cells on a board. In my solution I have used a 20 x 20 array, because it roughly suits the default size of the screen that pops up when the code is run. Of course, we could have also written the program to let the user specify the size of the board. We can declare the size of this board as a constant right at the beginning, so in future we can easily alter it's size without having to go through the entire code:const int WIDTH = 20, HEIGHT = 20; (it's customary to give constants names in uppercase, the const means the program can't alter these variables, and the int declares them as integer variables)
I have used an array of integers to track live (1) versus dead (0) cells, though this could also be accomplished using an array of booleans (true/false). For this solution, the initial configuration has to be input manually (no, I didn't sit and write out all the curly brackets and "0," x400, I wrote a program that did it for me!) - I have put in a little star pulsar pattern that repeats itself every third generation, to give us something pretty to look at when the program is complete! The code below declares a two-dimensional array of integers named "board", with HEIGHT+2 rows and WIDTH+2 columns (the reason for the +2 will become clear later...)
int board[HEIGHT + 2][WIDTH + 2] = {
{ 0, 0, 0, 0, 0, 0, 0, 0, 0, 0, 0, 0, 0, 0, 0, 0, 0, 0, 0, 0, 0, 0 },
{ 0, 0, 0, 0, 0, 0, 0, 0, 0, 0, 0, 0, 0, 0, 0, 0, 0, 0, 0, 0, 0, 0 },
{ 0, 0, 0, 0, 0, 0, 0, 0, 0, 0, 0, 0, 0, 0, 0, 0, 0, 0, 0, 0, 0, 0 },
{ 0, 0, 0, 0, 0, 0, 0, 0, 0, 0, 0, 0, 0, 0, 0, 0, 0, 0, 0, 0, 0, 0 },
{ 0, 0, 0, 0, 0, 0, 0, 0, 0, 0, 0, 0, 0, 0, 0, 0, 0, 0, 0, 0, 0, 0 },
{ 0, 0, 0, 0, 1, 1, 1, 0, 0, 0, 1, 1, 1, 0, 0, 0, 0, 0, 0, 0, 0, 0 },
{ 0, 0, 0, 0, 0, 0, 0, 0, 0, 0, 0, 0, 0, 0, 0, 0, 0, 0, 0, 0, 0, 0 },
{ 0, 0, 1, 0, 0, 0, 0, 1, 0, 1, 0, 0, 0, 0, 1, 0, 0, 0, 0, 0, 0, 0 },
{ 0, 0, 1, 0, 0, 0, 0, 1, 0, 1, 0, 0, 0, 0, 1, 0, 0, 0, 0, 0, 0, 0 },
{ 0, 0, 1, 0, 0, 0, 0, 1, 0, 1, 0, 0, 0, 0, 1, 0, 0, 0, 0, 0, 0, 0 },
{ 0, 0, 0, 0, 1, 1, 1, 0, 0, 0, 1, 1, 1, 0, 0, 0, 0, 0, 0, 0, 0, 0 },
{ 0, 0, 0, 0, 0, 0, 0, 0, 0, 0, 0, 0, 0, 0, 0, 0, 0, 0, 0, 0, 0, 0 },
{ 0, 0, 0, 0, 1, 1, 1, 0, 0, 0, 1, 1, 1, 0, 0, 0, 0, 0, 0, 0, 0, 0 },
{ 0, 0, 1, 0, 0, 0, 0, 1, 0, 1, 0, 0, 0, 0, 1, 0, 0, 0, 0, 0, 0, 0 },
{ 0, 0, 1, 0, 0, 0, 0, 1, 0, 1, 0, 0, 0, 0, 1, 0, 0, 0, 0, 0, 0, 0 },
{ 0, 0, 1, 0, 0, 0, 0, 1, 0, 1, 0, 0, 0, 0, 1, 0, 0, 0, 0, 0, 0, 0 },
{ 0, 0, 0, 0, 0, 0, 0, 0, 0, 0, 0, 0, 0, 0, 0, 0, 0, 0, 0, 0, 0, 0 },
{ 0, 0, 0, 0, 1, 1, 1, 0, 0, 0, 1, 1, 1, 0, 0, 0, 0, 0, 0, 0, 0, 0 },
{ 0, 0, 0, 0, 0, 0, 0, 0, 0, 0, 0, 0, 0, 0, 0, 0, 0, 0, 0, 0, 0, 0 },
{ 0, 0, 0, 0, 0, 0, 0, 0, 0, 0, 0, 0, 0, 0, 0, 0, 0, 0, 0, 0, 0, 0 },
{ 0, 0, 0, 0, 0, 0, 0, 0, 0, 0, 0, 0, 0, 0, 0, 0, 0, 0, 0, 0, 0, 0 },
{ 0, 0, 0, 0, 0, 0, 0, 0, 0, 0, 0, 0, 0, 0, 0, 0, 0, 0, 0, 0, 0, 0 }
};
2. What are the outputs?
We want to display the board to the screen in response to a user prompt (e.g. pressing the Enter key to bring up the next generation). Rather than showing 1s and 0s, it would be more visually appealing to show asterisks for live cells and just a blank for dead ones. The function display_board below uses board as an input and uses a nested loop (i.e. loop within a loop) to go through all the rows and columns to print "*" to a screen when the ith row and jth column of the board has an entry of 1.In C++, when functions are defined, you must declare whether the function returns a value or variable. The display_board does not return anything, as it simply prints stuff to the user's screen so we declare it as a "void" function. The "for" loops can be interpreted as: starting with an integer, i at 1, increment i by 1 each time (i++) while i is smaller than HEIGHT+1. "cout <<" means output the statements that follow to the screen and "endl" simply puts the cursor onto a new line.
void display_board(int board[HEIGHT+2][WIDTH+2])
{
for (int i = 1; i < HEIGHT+1; i++)
{for (int j = 1; j < WIDTH+1; j++)
{
if (board[i][j] == 1)
cout << "*";
else
cout << " ";
}
cout << endl;
}
}
3. Solve the problem!
To work out what the pattern of the new generation of cells looks like, we need to look at the neighbouring cells of every cell in the current generation. The problem brief specifies that every cell has 8 neighbours - however, this is not strictly true, because the cells at the very edges of our board will have fewer than 8 neighbours. In order to get around this, we actually use a 22x22 size board to help us calculate each generation's births and deaths (i.e. giving our 20x20 board a border with the width of 1 cell), but when we are choosing what to display to the user, we only iterate over the inner 20x20 board, and reset the "shell" to dead cells every period (because they technically don't exist and are not part of the game).We need to know what the previous generation's board looks like in order to calculate the new generation, but after this has been done, we can discard the old board. This means we need to have two boards to work with at one time, as well as a function to copy the board that we use for our calculations onto the board used by the display_board function to show the latest generation.
The new_generation function below takes our board as an input and creates a temporary board of the same size. This temporary board is then filled with 1s and 0s according to the rules of the Game of Life using the configuration of our input board. When this has been done, our board with the initial configuration is overwritten with the temporary board using the copy_board function.
void new_generation(int board[HEIGHT + 2][WIDTH + 2])
{
int temp_board[HEIGHT+2][WIDTH+2];
int neighbours;
for (int i = 0; i < HEIGHT+2; i++)
{
for (int j = 0; j < WIDTH + 2; j++)
{
if (i == 0 || j == 0 || i == HEIGHT + 2 || j == WIDTH + 2)
temp_board[i][j] = 0;
else
{
//counting alive neighbouring cells
neighbours = board[i - 1][j - 1] + board[i - 1][j] + board[i - 1][j + 1]
+ board[i][j - 1] + board[i][j + 1]
+ board[i + 1][j - 1] + board[i + 1][j] + board[i + 1][j + 1];
if (board[i][j] == 1)
{
if (neighbours < 2 || neighbours > 3)
temp_board[i][j] = 0; //cell dies due to loneliness or overcrowding
else
temp_board[i][j] = 1; //don't strictly need to write this line, but I have added it for extra clarity
}
else
{
if (neighbours == 3)
temp_board[i][j] = 1; //birth of a new cell
else
temp_board[i][j] = 0;
}
}
}
}
copy_board(temp_board, board);
}
void copy_board(int board1[HEIGHT + 2][WIDTH + 2], int board2[HEIGHT + 2][WIDTH + 2])
{
for (int i = 0; i < HEIGHT + 2; i++)
{
for (int j = 0; j < WIDTH + 2; j++)
{
board2[i][j] = board1[i][j];
}
}
}
Once we have the display_board, new_generation and copy_board functions, all we need to do is implement them in the main function of the program! The code below has a "while" loop that keeps repeats as long as the user hits the Enter key. The program displays the board, then reads the user's input using the command cin.get(repeat) and then calculates the next generation of LIFE. cin is like the opposite of cout - it reads in a user's input from the keyboard and we are asking it to "get" one character (which I have called repeat). '\n' is the way we represent the "Enter" character in C++.
int main()
{
char repeat;
do
{
display_board(board);
cin.get(repeat);
new_generation(board);
}while (repeat == '\n');
return 0;
}
For the initial configuration I entered, the displayed output should look a little something like an asterisk version of this:
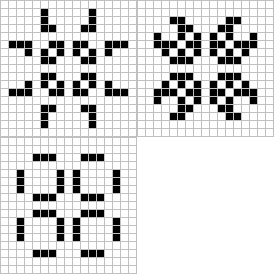 |
| Ta da! |